Showing posts with label Ruby on Rails development. Show all posts

Tuesday, 25 April 2017

Deploy Ruby on Rails project with Passenger and Ngnix

Assuming that you have installed ruby and rails at your server and have a Ruby on rails project to deploy with Passenger and Ngnix


Step 1 - First of all we need to add a Sudo User to our system so user can have privilege to access the files.

create a user if not exists, in this example We will explain to create a root user

tecorb@tecorb-Lenovo-B40-80:~$  adduser root
(this will ask few questions like your password etc.)


Step 2 - Now we have to add this new user to the sudo group

Syntex:
tecorb@tecorb-Lenovo-B40-80:~$ gpasswd -a root sudo

Step 3 - Now we need to install Passenger and Nginx

First of all we will install a PGP (Pretty Good Privacy) key:

tecorb@tecorb-Lenovo-B40-80:~$  sudo apt-key adv --keyserver keyserver.ubuntu.com --recv-keys 561F9B9CAC40B2F7

Now we have to create an APT (Advanced Packaging Tool) source file

tecorb@tecorb-Lenovo-B40-80:~$  sudo vim /etc/apt/sources.list.d/passenger.list

And insert the following line in the file:

deb https://oss-binaries.phusionpassenger.com/apt/passenger trusty main

Press ESC then :wq and hit enter, Now our file has been saved through vi editor

Now we need to change the owner and permissions for this passenger.list file:

tecorb@tecorb-Lenovo-B40-80:~$  sudo chown root: /etc/apt/sources.list.d/passenger.list
tecorb@tecorb-Lenovo-B40-80:~$  sudo chmod 600 /etc/apt/sources.list.d/passenger.list

Now we have to update our APT cache:

tecorb@tecorb-Lenovo-B40-80:~$   sudo apt-get update

And finally, we will install Passenger with Nginx:

tecorb@tecorb-Lenovo-B40-80:~$  sudo apt-get install nginx-extras passenger

Step 4- In this step we will open the Nginx configuration file for some changes:

tecorb@tecorb-Lenovo-B40-80:~$  sudo vim /etc/nginx/nginx.conf

Now file will be open in vi editer, Uncomment given line, These lines will look like this:

# passenger_root /usr/lib/ruby/vendor_ruby/phusion_passenger/locations.ini;
# passenger_ruby /usr/bin/ruby;

uncomment these lines and update the path mentioned in the passenger_ruby line and add default user :

passenger_default_user root;
passenger_root /usr/lib/ruby/vendor_ruby/phusion_passenger/locations.ini;
passenger_ruby /usr/local/rvm/gems/ruby-2.3.0/wrappers/ruby;


Note if you are unable to get what is your path to ruby then follow these steps:

tecorb@tecorb-Lenovo-B40-80:~$   which passenger-config
this will return a path like: /usr/bin/passenger-config

If you are on RVM and use Ruby 2.2.1 (version can be whatever you are using)

tecorb@tecorb-Lenovo-B40-80:~$  rvm use 2.2.1

Now finally, we will invoke passenger-config with its full path, passing --ruby-command as parameter like:

tecorb@tecorb-Lenovo-B40-80:~$  /usr/bin/passenger-config --ruby-command

This will show you something like:

  To use in Apache: PassengerRuby /usr/local/rvm/wrappers/ruby-1.8.7-p358/ruby
  To use in Nginx : passenger_ruby /usr/local/rvm/wrappers/ruby-1.8.7-p358/ruby
  To use with Standalone: /usr/local/rvm/wrappers/ruby-1.8.7-p358/ruby /opt/passenger/bin/passenger start

From here you will get path for your passenger_ruby (Nginx). This path will use at passenger_ruby in nginx.conf

Now finally we will save our file and exit by Press ESC then type :wq and hit enter.

Step 5- Now we have all most done, we need to disable the default Nginx configuration at Nginx config file:

tecorb@tecorb-Lenovo-B40-80:~$  sudo vim /etc/nginx/sites-available/default

Findout these lines and comment them:

# listen 80 default_server;
# listen [::]:80 default_server ipv6only=on;

Save this config file, Press ESC then type :wq and hit enter.

Step 6- Now we will create an Nginx configuration file for our application (like our app name is tecorbapp):

tecorb@tecorb-Lenovo-B40-80:~$  sudo vim /etc/nginx/sites-available/tecorbapp

Add the following server block into this file:

server {
  listen 80 default_server;
  server_name tecorbdomain.com www.tecorbdomain.com;
  passenger_enabled on;
  passenger_app_env development;
  root /home/rails/tecorbapp/public;
}

In this file we enable listening on port 80, set our domain, enable Passenger, set the application environment here we have used development environment and set the root to the public directory of our ruby on rails project.
If you don't want to add your domain to the application, you can skip the server_name line from this file, or if you want to use any IP address you can replace
tecorbdomain.com www.tecorbdomain.com with your ip address.

Now we will save this config file, Press ESC then type :wq and hit enter.

Step 7- Now finally we will create a symlink this file:

tecorb@tecorb-Lenovo-B40-80:~$   sudo ln -s /etc/nginx/sites-available/tecorbapp /etc/nginx/sites-enabled/tecorbapp

and Restart our Nginx:

tecorb@tecorb-Lenovo-B40-80:~$  sudo nginx -s reload

Now our application should be accessible from our domain, go to your browser and hit the domain.


Good Luck!

Friday, 3 February 2017

AngularJs with Ruby on Rails Task-3

In Part-2 we have worked with the controller and model in angularJs with Ruby on Rails  and submitted the book form, add that book into the list.
Today we will discuss how to save and get and save data  from/to  the database model using API in ruby on rails with the help of AngularJs.
Lets proceed further :
Step 1: First of all we have to create a Book model in rails with name attribute. And migrate the migration.
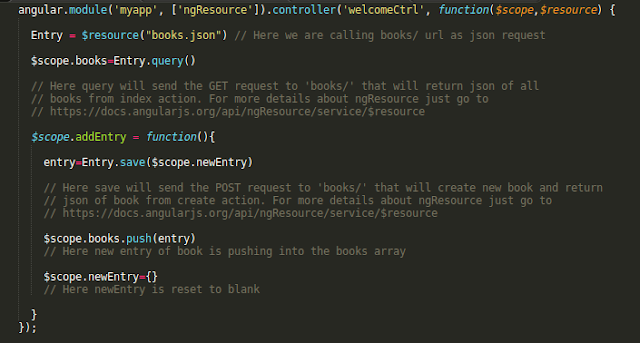
Step 2. Now create a  books controller in rails that will contain two actions first for index (to  make an api to get all books records from the db) and another for create( to save data in Book Model). And generate the routes for both of these.
  • Assuming that you are generating the routes using resources :books  in route.rb
  • So for index action path will be ‘books/’ with GET type and for create action path will be same ‘books/’ with POST type.
 Step 3: Now we have to create the JSON Apis for index and create in our books controller like so we can call them from angularJs Controller 
 Ruby on Rails Development company

Step 4: Now from AngularJS controller that we have defined in welcome.js we have to call these apis to fetch the book records and save the book into the database.

 ruby on rails development company in USA
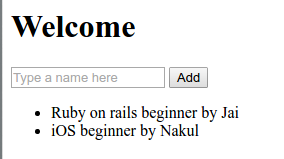
Now We have all done. Refresh your page add book from text-box that will save into your database and all blow listing will be fetch from database. Have fun with AngularJS

 Angularjs with ruby on rails

If you are, looking to Develop and design for your project then feel free to contact us at any time
Call Us- +91 9910781148, +1 8033353593
Email: company@tecorb.com
Skype- tecorb
“We maintain transparency with our customers. Our values and business ethics has given us repeated customers. We tend are proud to be a reliable outsourcing partner for many clients across the World.”

Tuesday, 31 January 2017

AngularJs with Ruby on Rails Task-II

In Part-I we have done how to use basic AngularJs in our Rails Project.
Now today we will work with the controller and model in angular js and submit that book form and add that book into the list.

Let’s proceed further:

Step 1: Now we will define a controller into our view (index.html.erb) using a div using ‘ng-controller’ like:

Step 2: Now we will define the controller in the welcome.js file

Here ‘myapp’ is same as we have defined in application.html.erb within ‘ng-app’ and ‘welcomeCtrl’ is same which we have defined in view index.html.erb.

$scope is an object by which we will use to interact with the view, we can get and set variables and functions on it.

Here we have set a books array with hashes as the elements.

Step 3: Now first of all we have to access this books array on our view and show a list of books . So come to the index.html.erb and add a list like:

Here ‘ng-repeat’ will works like as loop and return every book one by one that are available in books array.

Now Refresh the browser and you will see a list of available books.


Step 4: Now we have to submit this form and add the value to the list shown below.

For this we have to add  ng-submit="addEntry()" in our form tag. Basically ‘ng-submit’ will call the ‘addEntry()’ method when this form will submit. Like,

<form ng-submit="addEntry()">

Step 5: Now we have to define this ‘addEntry()’ method in our Angular controller that we have defined in welcome.js file


Here $scope.books.push($scope.newEntry) will push the newEntry object in books array. ‘newEntry’ is that object which will use to access the form fields as we have described in Part-I blog.

And after pushing the newEntry data into books array we have to reset the fields so we will initialize ‘newEntry’ with null {}

Now All Done, refresh and add some book.


If you are, looking to Develop and design for your project then feel free to contact us at any time
  • Call Us- +91 9910781148, +1 8033353593
  • Email: company@tecorb.com
  • Skype- tecorb
“We maintain transparency with our customers. Our values and business ethics has given us repeated customers. We tend are proud to be a reliable outsourcing partner for many clients across the World.”

Thursday, 26 January 2017

AngularJs with Ruby on Rails Task-1

As we know that Ruby and Rails is a great for  building the backend (Server) Apis. AngularJs is great for building the client side JavaScript Applications. So by combining both of these together for building the applications then surly they will deliver a  great products. So I think AngularJs is a great tool for building the application with Ruby on Rails.

Lets proceed for using AngularJs in our Rails Application:

Step 1: Create a rails application like lets say ‘angulardemo’

Step 2: Add gem "angularjs-rails" to your gem file and do bundle.

Step 3: Now bind the ng-app="myapp" with html tag in application.html.erb like:

          <html ng-app="myapp">

 And in application.js  just add
         
          //= require angular

The ng-app directive defines that this is an AngularJS application

 Step 4:  Make a controller with index action and set this as root in route.rb

Step 5: Now we are going to make a simple form that will take a book name from user and add this name in the books list shown below.

So for this first of all we have to put a html form with name attribute that will be the book name.

 RoR Development company


Step 6: Now add  ng-model="newEntry.name" with this text box like:

<input type="text" name="name" placeholder="Type a name here" ng-model="newEntry.name" autocomplete="off">

Here ‘ng-model’ binds the value of HTML controls like select,input etc to application data.
And ‘newEntry’ is the object that will working with in this form and name being an attribute that will set on this object for this given field.

Step 7: Now put {{newEntry.name}}  below the form

this will print the model value when you will type in the textbox now. So refresh your page and try to write in your text field and look you will notice same text will appear below the form what you are typing now.

 ruby on rails development


So in this Part we have learn how to use AngularJs in our Rails Application.

In Next part we will discuss the working with controller and submit this form and add this name to a list.

If you are, looking to Develop and design for your project then feel free to contact us at any time
  • Call Us- +91 9910781148, +1 8033353593
  • Email: company@tecorb.com
  • Skype- tecorb
“We maintain transparency with our customers . Our values and business ethics has given us repeated customers. We tend are proud to be a reliable outsourcing partner for many clients across the World.”


Friday, 23 September 2016

Feel secure while choosing Ruby on Rails for your application as comparatively others.


Ruby on Rails is a popular framework for web applications, built on the dynamic Ruby programming language. Estimates indicate that a quarter of a million websites use it, including Airbnb, Basecamp, Groupon, Hulu, and Slideshare. Developers love working with it because it is expandable and it helps them get from concept to prototype quickly.


I am a good believer in secure by default and making security easy for developers. Some can argue that by create security easy, it can make developers pay less attention to security and possibly lead them to making creating security mistakes. Kind of like a horse with blinkers on. In reality I think it is probably a balance, do not create security invisible to the developer but instead create it just easy enough for them to implement in right way.

So be warned! Do not just RORs built in security features thinking that they offer a 100% most effective way at mitigating the vulnerabilities they could designed to prevent against. Instead, learn how to used them rightly and know their limitations.


For major security issues or error, the current release series, the next most recent one, and the last additional major series may receive or take patches and some latest versions. This is currently new versions 5.0.x and 4.2.x.


When a release series is no longer supported, it’s your own responsibility to deal with issues or errors. We can offers backports of the fixes and publish them to git, however there may be no new versions released. If you are not comfortable maintaining your own versions, you should upgrade to a new supported version.


As we have seen, Rails provides many built in security features to help protect our applications, data and users from web based virus attacks and some other attacks. But we also saw that these have their limitations. For security features that Rails does not provide by default there are always Gems, lots and lots of Gems

System or devise is a popular authentication and authorisation Gem for Rails. It provides secure password storage using bcrypt to hash salted passwords. User lockouts, user registration, forgot password functionality and more.

Although system or Devise’s own README states, “If you may building your 1ST Rails application, we recommend you do not use Devise or System”, I would ignore this statement. If you are security aware and you have built applications in other frameworks before, I do not see any issue or error with using Devise or system for your IST Rails application.

URL: https://github.com/plataformatec/devise
Brakeman

Brakeman is a Static Code Analysis (SCA) tool for Rails applications. It searches your application’s source code for potential vulnerabilities. Although it can report the occasional False or Positive, personally, I think this is a great Gem and one I would definitely recommend running against your application before going into production. Even better, run it after every commit.

URL: https://github.com/presidentbeef/brakeman
secure_headers

Developed by Twitter, Secure Headers is a Gem that implements security related HTTP (Hypertext Transfer Protocol) headers into your application’s HTTP(Hypertext Transfer Protocol) responses. Headers such as Content Security Policy to help protect against Cross-Site Scripting (XSS) attacks, HTTP Strict Transport Security (HSTS) to ensure your site is only accessible over secure HTTPS, X-Frame-Options and others.

URL: https://github.com/twitter/secureheaders
rack-attack


Developed by Kickstarter, Rack::Attack is a Gem for blocking & throttling abusive requests.   Personally, I use Rack::Attack to prevent forms being abused, for example, instead of implementing a CAPTCHA on a submission form, I use Rack::Attack to ensure it is not submitted too many times in a short space of time. This would prevent automated tools from abusing the form submission. It also supports whitelisting and blacklisting of requests.